Free Recipes

Lefse

When I was a kid growing up on our small dairy farm in Wisconsin that had been homesteaded by Norwegian immigrants in the late 1800s, I figured everyone knew how to make lefse. After all, everyone I knew could make lefse, so didn’t that mean everyone else could make it too?

That was forty years ago.

Now I know better.

In the rural area where I live, however, at least a few people still do know how to make lefse. And at Christmas, you can even buy lefse in some of the grocery stores around here.

Several years ago, a girl from Norway was a foreign exchange student at the local high school. When she found out some people in Wisconsin still make lefse and that we consider it a delicious delicacy, she expressed amazement. “I can’t believe you make that yet. We don’t do it anymore in Norway,” she said.

‘What?’ I thought. ‘No lefse?! What’s the matter with those Norwegians?’

During the latter part of the 1800s, 30,000 Norwegians immigrated to Wisconsin. Today, nearly a half million people are their descendants out of a total population of 5.5 million. In other words, almost 10 percent of Wisconsin residents are of Norwegian descent.

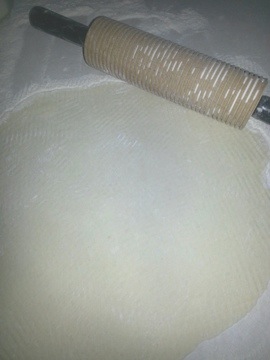
Expert lefse makers use a lefse griddle (a large, round electric griddle that heats up to 500 degrees), a grooved lefse rolling pin, and flat wooden lefse turners. But you don’t have to buy special equipment to make lefse. You can use ordinary kitchen utensils: an electric fry pan (that heats up to 400 or 450 degrees Fahrenheit), a rolling pin, a pancake turner, and a large mixing bowl. You will also need potatoes, butter or margarine, a little sugar, some milk, and flour.

Rolling lefse is a skill that requires plenty of patience and lots of practice. Expert lefse makers produce pieces that are as large as the top of a snare drum and practically thin enough to read a newspaper through. My lefse, which turns out just like my mother’s did, is about the size of a dinner plate and somewhat thicker.

Lefse experts recommend ricing the cooked potatoes, but my mother always mashed the potatoes. Refrigerating the mashed or riced potatoes overnight makes the lefse easier to roll out.

When you’re ready to start making lefse, take the potatoes out of the refrigerator and mash or rice them again. I have one of those crisscross patterned potato mashers, and it works well for taking the lumps out of the mashed potatoes. Lefse rolls out easier if the dough is cold, so make sure the potatoes are cold when you start. You may also want to refrigerate the dough for a while after you mix it. I have noticed that when I reach the end of the batch and the dough is starting to warm up, the lefse is harder to roll out.

Making a batch of lefse from this recipe takes about one and a half hours and will yield approximately two dozen pieces, depending upon how much dough you use for each one.

Here’s my mother’s lefse recipe from the book Christmas In Dairyland.

Lefse

– 4 heaping cups of mashed or riced potatoes
– 1 stick of butter (or margarine)
– 1/3 cup of milk
– 1 teaspoon of sugar
– 1 teaspoon of salt
– 2 cups of flour
– extra flour for rolling out the dough.

Measure out the mashed/riced potatoes into a large mixing bowl. In a medium-sized saucepan, melt the butter/margarine in the milk; stir in the sugar and salt. Then pour over the cold mashed (riced) potatoes and mix.

Stir two cups of flour into the potato mixture. The dough will be sticky and soft.

Start heating the griddle or electric frying pan. Do not add any oil, margarine or shortening. Lefse is baked on a dry surface.

Take a lump of dough about the size of an egg. Place a heaping teaspoon of flour on the surface where you’re going to roll out your lefse. Work about half of the heaping teaspoon of flour into the lump of dough (enough so you can handle the dough, but not so much that the dough becomes dry).

Starting in the center, roll outward until the lefse is about the size of a dinner plate. Try not to roll the lefse so thin that you cannot pick it up. If the lefse tears when you start to pick it up, gather it into a lump and roll it out again. Don’t do this too many times, though, or your lefse will end up tough and dry. Ideally, you should only roll the lefse once, although that’s probably not a realistic expectation if you’ve never made lefse before. Also try to turn the lefse only once while you are rolling it out. If the lefse starts to stick, add a little more flour.

20130309-150214.jpg

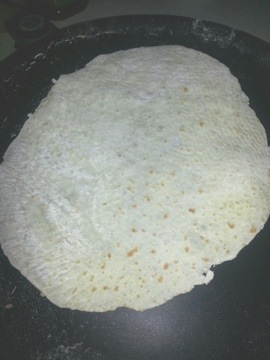
When you have the lefse rolled out, transfer it to the hot griddle. Carefully pick it up and quickly move it. If you move slowly, the lefse is more likely to tear. Expert lefse makers use flat lefse turners (they look like long flat sticks) to transfer the dough by rolling it onto the turner and then unrolling it onto the griddle. You can also try rolling your lefse onto the rolling pin and transferring it to the griddle or the fry pan.

Once you have the lefse on the griddle, bake it for about a minute, just until brown ‘freckles’ start to appear; then turn the lefse over and let the other side bake just until brown freckles start to appear. While the first piece of lefse is baking, roll out your second one.

20130309-150417.jpg

After the first piece of lefse is done, use the pancake turner to remove it from the griddle and place it on a clean dishtowel. Cover with another dishtowel.

Bake the second lefse and roll out the third piece.

When the second lefse is finished, place it on top of the first one and cover with the towel again.

Then bake the third piece.

Repeat until you have baked all of the dough. Place each newly baked lefse on top of the previously baked lefse and cover the stack with the towel.

20130309-150602.jpg

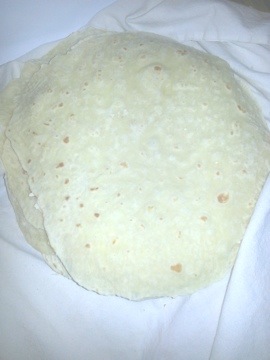
Once the lefse is completely cool, place it in a plastic bag or wrap it with plastic wrap or aluminum foil to help keep it moist. You must wait until the lefse is completely cool before wrapping it, otherwise the heat from the lefse will condense inside of the plastic or the aluminum foil, and your lefse will end up soggy. If you leave the lefse overnight without wrapping it in plastic or aluminum foil, it will probably be dried out in the morning. If the lefse dries out, sprinkle a little water on the dishtowel and wrap the dishtowel and the lefse in plastic. The lefse will soften up again.

When you’re ready to eat a piece of lefse, spread it with butter (or margarine), sprinkle sugar on it (some people also like to sprinkle cinnamon on their lefse), and roll into a log.

Also, once the lefse is cool, it can be frozen.

Sweet and Sour Chicken

This was one of my mother’s favorite chicken recipes because it’s so easy. Also, it does not contain any salt. My mother had high blood pressure and avoided extra salt in the food she cooked. And since she had been stricken with polio when she was 26 and paralyzed in both legs, she looked for easy recipes that did not require much standing around in the kitchen. Mom had to lean on the counter with one hand and cook with the other.

  • 4 chicken breasts
  • 1/2 cup lemon juice
  • 1/4 cup cooking oil
  • 2 tablespoons honey
  • dash of garlic (more if you prefer a stronger garlic taste) (you can also use a clove of garlic chopped into small pieces, if desired)

In a small saucepan, cook the lemon juice, oil, honey and garlic for one minute.

Put the chicken breasts into a greased baking dish. Pour the marinade over the chicken breasts and set in the refrigerator for one hour.

Bake the chicken breasts at 350 degrees for 1.5 hours. Baste several times while baking.

Note: if desired, add 1/4 teaspoon of salt to the marinade. My mother never used salt because she suffered from high blood pressure.

Royal Rhubarb Pie

Filling:

  • 2 tablespoons water
  • 4 cups rhubarb (cut up)
  • 2 cups sugar
  • 3 tablespoons cornstarch
  • a pinch of salt
  • 1/2 cup milk (cream, or Half & Half. I have also used a 1/2 cup of frozen vanilla yougert “ice cream”)

Note: If you’re using the ‘old-fashioned’ rhubarb with the greenish stalks, add several drops of food coloring. If you’re using the Canadian Red rhubarb, there’s no need for food coloring.

Make pie crust (see below) and bake the bottom shell at 350 degrees for 15 minutes.

While the pie shell is baking, put rhubarb, 1 3/4 cups sugar and 2 tablespoons of water into a saucepan and cook over medium heat for 10 minutes, stirring constantly. Remove from burner.

Mix 1/4 cup sugar with 1/4 cup cornstarch and stir into the hot rhubarb mixture. Add milk (cream or Half & Half). Cook until thick.

Pour filling into the baked pie shell. Add crumble crust. Bake at 350 degrees for 20 minutes until crust is lightly browned. Allow to cool thoroughly before cutting.

For an added treat, serve with whipped cream or vanilla ice cream.

Pie Crust:

  • 3 cups flour
  • 1 teaspoon salt
  • 2 teaspoons sugar
  • 2/3 cup cooking oil (I like to use Canola oil)
  • 1/3 cup water or milk

Measure all ingredients into a mixing bowl and stir with a fork.

Put half of the mixture into a 10-inch pie plate and pat down with the back of a spoon (or use your fingers) to form the pie crust.

Bake at 350 degrees for 15 minutes.

Mix 1/4 cup of brown sugar with the remaining pie crust and sprinkle on top of pie to form a “crumble crust.” (Makes a generous crumble crust).

Bake in a 350 degree oven for 20 minutes or until the crumble crust is slightly browned.

Cheesy Lasagna

Here is another casserole recipe that you can use for supper, to take to a friend who is feeling under the weather or for a POTLUCK! What would life in the country be like without potlucks?

  • 6 cups cooked egg noodles
  • 1 jar of spaghetti sauce
  • 1 pound of hamburger browned
  • 1/2 cup sour cream
  • 4 ounces cream cheese
  • 3 cups grated cheddar cheese
  • 1 cup sliced black olives (optional)Combine all ingredients in a casserole dish except for 1 cup of the cheddar cheese. Mix well. Sprinkle 1 cup of cheddar cheese on the top. Cover. Bake at 350 degrees for 1 hour. Serve with garlic bread (or garlic breadsticks) and a salad. Yum!

Swedish Tea Ring

A fancy version of Cinnamon Rolls — and easy, too!

This pastry looks like you spent hours slaving over the dough. In reality, it takes 2 hours from start to finish because it is basically my cinnamon roll recipe (well, maybe it takes a bit more than 2 hours when you add the frosting glaze).

I made this for the breakfast after the Sunday school Christmas program, and there wasn’t much left to take home!

2 cups warm water
2 packages of dry yeast (or 4 teaspoons bulk yeast)
1/2 cup sugar
1 teaspoon salt
1/2 cup cooking oil (I like to use Canola oil)
2 eggs
6 to 7 cups of flour
1 cup chopped walnuts (optional)

To decorate:
~~~~~~~~~~
walnuts
candied cherries

Frosting Glaze:
~~~~~~~~~~~
3 to 4 cups of powdered sugar
1 teaspoon of vanilla
a pinch of salt

Add water or milk by the tablespoon until the glaze will dribble off a spoon.
Measure warm water into a large mixing bowl and dissolve yeast in warm water. Stir in sugar, salt, cooking oil. Beat in eggs. Beat in 2 to 3 cups of flour. Stir in remaining flour. Knead on a floured surface. If dough is too sticky, knead in a little more flour, a quarter cup at a time.

Let the dough rest for 20 minutes.

Knead dough for a few minutes.

Roll out dough into a rectangle approximately 24 inches long by about 16 inches wide. Spread with soft butter. Sprinkle with sugar and cinnamon.

Beginning on the wide side, roll up dough. When the dough is rolled, be sure the seam is on the bottom. Grasp dough on each end and pull gently to stretch the dough another couple of inches.

Cut the roll of dough in half.

Grease two cookie sheets.

Take each end of one roll and put them together on the cookie sheet to form a circle. Use a scissors to cut about a third to a half the way through the dough at two inch intervals all around the circle. Gently turn the dough outward. That is, grasp the dough and turn it on its side so that the cuts are on the outside instead of on the top.

Repeat with the other roll.

Set in a warm place to rise for 45 minutes.

Bake at 350 degrees Fahrenheit for 25 to 35 minutes.

Allow the tea rings to cool completely.

Frost with powder sugar glaze. Use a spoon to drizzle the glaze over the tea rings. Decorate with walnuts and/or candied cherries before the glaze has a chance to set.

Cut into slices to serve.

Note:
This recipe makes two *large* tea rings.

Russian Tea

This is a nice warm drink on a cold winter day.

1 cup of powdered orange drink
1 cup of sugar
1 teaspoon ground cinnamon
1/2 teaspoon ground cloves
1/2 cup instant tea

Mix the dry ingredients. Store in a jar or another covered container.

Use 2 teaspoons of the mix per cup of hot water.

Oatmeal Peanut Butter Bars

The bottom line is — these Oatmeal Peanut Butter Bars are just plain good! My husband loves them and could eat the whole pan by himself.

  • 1/2 cup butter
  • 1/2 cup shortening
  • 1 cup brown sugar
  • 1 cup white sugar
  • 2 eggs
  • 1 teaspoon vanilla
  • 1/2 cup peanut butter
  • 1 1/2 cups flour
  • 1/2 teaspoon salt
  • 1 teaspoon soda
  • 3 cups dry oatmeal (I have used both quick-cooking or old-fashioned)

Cream the shortening, butter and sugars. Stir in the eggs, vanilla, and peanut butter. Stir in remaining ingredients. Put in a greased 9×13 pan. Bake at 350 degrees Fahrenheit for 25 to 30 minutes. Let cool. Frost with chocolate frosting.

Chocolate Frosting

  • 1 2/3 cup sugar
  • 6 tablespoons butter
  • 6 tablespoons milk
  • 2/3 cup chocolate chips

Boil the sugar, butter and milk for 30 seconds. Stir in the chocolate chips until smooth. Pour the frosting over the oatmeal bars and allow to cool before cutting.

Frying Pan Date Cookies

A somewhat unusual cookie recipe, but fun to make. Once you have added the cup of Rice Krispies and if the cookies still seem a little too moist, add Rice Krispies by the quarter cup until you get the desired consistency. Then roll in coconut.

1 egg beaten
1/2 cup sugar
1 cup dates (chopped)
1 cup Rice Krispies
1 cup chopped walnuts
1 teaspoon vanilla
coconut (to roll the cookies in)
Put the beaten egg, the sugar and the chopped dates into a frying pan and cook for several minutes until the mixture “leaves the pan” (i.e. is thick and sticky).

Add: 1 cup Rice Krispies, 1 cup chopped walnuts and 1 teaspoon vanilla.

Roll into small balls. Then roll in coconut.

Store in an airtight container between layers of wax paper.

Loretta’s Chocolate Bon-Bons

This recipe is featured in the story “Good Things Come in Small Packages” in LeAnn Ralph’s book, “Christmas in Dairyland“.

– 1 1/2 cups shredded coconut
– 1 stick butter
– 2 pounds powdered sugar
– 1 can sweetened condensed milk
– 2 cups chopped nuts
– 1 1/2 teaspoons vanilla
– 1 large package chocolate chips
– 2/3 bar paraffin
(Instead of chocolate chips and paraffin, the coconut balls can be dipped in melted chocolate almond bark.)

Mix coconut, butter, powdered sugar, condensed milk, nuts and vanilla. Roll into small balls. Chill in refrigerator for several hours or in the freezer for one hour. Melt chocolate chips and paraffin in a double boiler (or in a clean coffee can set on canning jar rings in a pan of water). Using a toothpick, dip the chilled coconut balls into the chocolate mixture. Place on wax paper until set.

Saltwater Taffy

When I was growing up on our small family dairy farm in Wisconsin, making taffy was a fun project for a Sunday afternoon in the winter.

20121209-132007.jpg

1 cup sugar

3/4 cup light corn syrup

2/3 cup water

1 tablespoon cornstarch

2 tablespoons butter

3/4 teaspoon salt

2 teaspoons vanilla (or another flavoring, such as peppermint or anise)

In a large saucepan, combine all ingredients except the vanilla. Stirring constantly, cook over medium heat until the mixture reaches 256 degrees Fahrenheit on a candy thermometer (or until a small amount dropped into a cup of cold water forms a hard ball).
Stir in vanilla. Pour into a buttered 8×8 square pan. Let cool.

Note: if you would like to make colored taffy, stir in a few drops of food coloring just before you add the vanilla or other flavoring.


When the mixture is cool enough to handle, rub a small amount of soft butter between your palms, take a handful of taffy and pull until it becomes stiff and lighter in color. Pull or roll into ropes and cut into pieces with a scissors.

To store the candy, let it sit for an hour or so and then wrap the individual pieces in plastic wrap or waxed paper.

Sweet Soup (Sot Suppe)

6 cups water
1/3 cup sugar
1 tablespoon quick-cooking tapioca
1/4 to 1/2 teaspoon cinnamon (depending upon how well you like the taste of cinnamon; you can also use a cinnamon stick)
2 cups dried fruit (use any kind you like: apples, apricots, peaches or a mixture of dried fruit)
1 cup raisins (dark or golden)
1 cup dried prunes
1 tablespoon lemon juice (you can also use 1 teaspoon of dried lemon rind or several slices of fresh lemon)

In a medium saucepan, combine the sugar, tapioca, cinnamon and water. Bring to boiling, stirring constantly. Stir in fruit (including the lemon if you’re using sliced lemon) and heat to boiling again. Cover. Simmer for 15 minutes, or until the fruit is tender.

After the fruit is tender, if you’re using lemon juice, stir in the lemon juice (or teaspoon of dried lemon rind). Serve either cold or warm, depending upon your preference. If you use a sliced lemon, remove the lemon rind before serving.

For a light afternoon ‘Norwegian’ lunch (after hiking, sledding, snowshoeing or cross-country skiing), serve sweet soup with Julekake or Christmas bread, Christmas cookies, open-faced sandwiches, and a variety of sliced cheeses.